Trouble shooter
If you have:
- checked your measurements,
- checked the symptoms below,
- checked everything in the setup (lasers and projection) parts of the User Guide
- and you are sure your setup is correct,
please follow the procedure on the Requesting Technical Support page to contact us.
Check your measurements
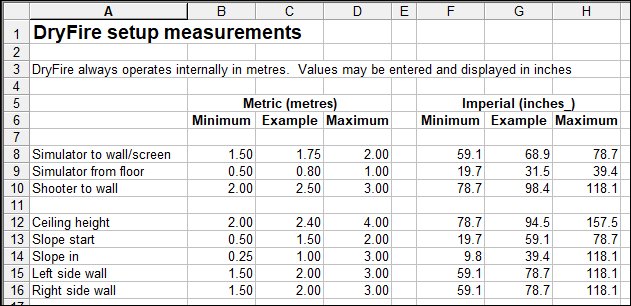
DryFire operates internally in metres (m) (see note below) and values entered in inches are converted to metres when the software is running.
So, when entering metric values, "750" (mm) would be interpreted as 750m and "75" (cm) would be interpreted as 75m. Both should have been entered as 0.75m
From "Settings", "Calibration", "Full calibration" select "Calibrate". Check "Simulator to wall", "Simulator from floor" and "Shooter from wall".
Click on "Advanced setup" and check the values there. Normally you don't have to enter anything here, but, if you do, double check that the values are reasonable. Don't change the values for "Eye height" and "Right of simulator" - these are established during the muzzle alignment procedure.
Note: there is an exception to the rule - the vertical line used during projections setup is measured in millimetres (mm).
Trouble symptoms:
- The software cannot connect to the simulator
- Can't see arrows during projection setup
- Other problems with projection setup
- Both laser and projected targets shown
- Shots not seen
- Random shots seen or heard
- "Pull" not heard
- Targets released before calling "Pull"
- Target results don't feel right
- Negative "uh uh" sound when doing alignment
- Hit shown as miss
- Targets going the wrong way
- Changing clay speed
- Adding an add-on
The software cannot connect to the simulator
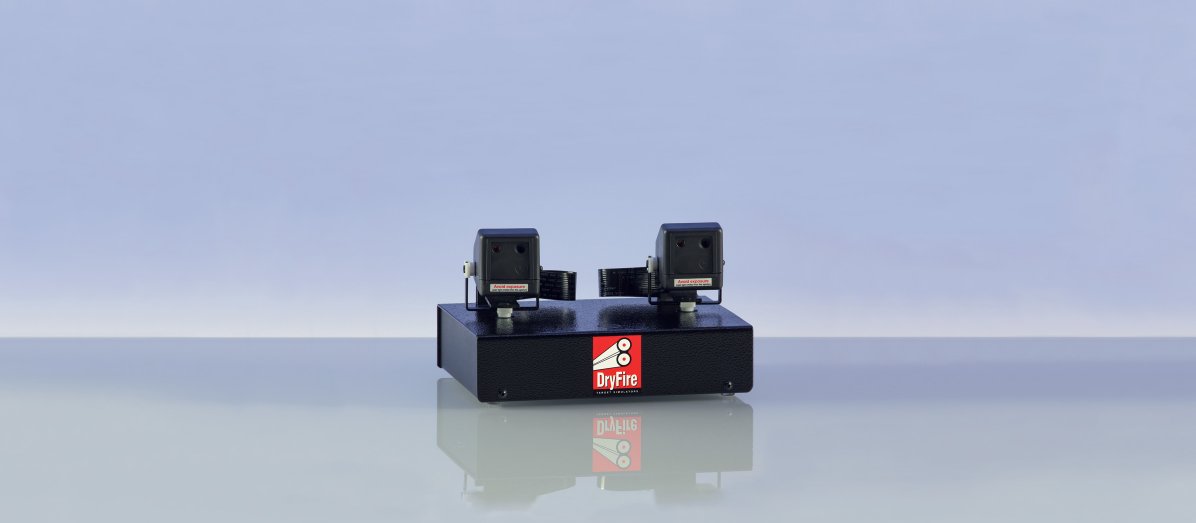
- For DryFire remove the USB cable from the PC/laptop. Switch off simulator power. Switch on simulator power. Reconnect the USB cable - the two heads on the simulator should nod once.
If the heads don't nod it is possible the wrong power supply has been used and the protection diodes inside the simulator have blown. Please click here for a procedure to run some tests on your simulator - including checking the power supply.
- Try a different USB cable.
- Try connecting to a different USB port.
- Try using a different PC/laptop if you have one - the DryFire software does not have to be installed for the heads to nod when power is on and the connection to USB is made.
- Long extension cables can result in a weak USB signal so try a shorter cable to connect the simulator directly to your PC/laptop.
If you still have problems after trying the above please:
- select the "continue without using simulator" option.
- Select "Settings", "Support", "Get help", "Contact support".
- Enter your email address, a description of the problem and click "Send".
- This will send us an email along with a detailed log of what the software is doing - this will help us to track down the problem.
Please see the Requesting Technical Support page for more details.
Can't see arrows during projection setup
Follow this procedure if, during projection setup, the tips of the four arrows are not shown on the projection screen.
With the DryFire software running and your projector working, select "Settings", "Support", "Advanced", "More options", "Check projector settings" then "Open check page".

- You are using "duplicated mode" if the PC screen and the projected image are the same. You must use "extended node". (See above.)
- The image is being cropped if you do not see a red border on all four sides..
Cropping must be corrected before carrying out the DryFire projection setup. Check your projector's manual or speak to your projector supplier..
Ensure the projector's aspect ratio is set to "Native" or "Auto" and that any "Image shift" or "Zoom" features are set to zero.
Other problems with projection setup
Wordcraft cannot provide support for specific projectors - you need to try various options in the projector's User Manual to get things working correctly, accurately and consistently.
Contact the projector supplier or manufacturer if you can't get it working at all with your PC/laptop.
Check the User Guide for details of Projector Setup.
- Is the projection add-on enabled in DryFire? Check "Settings", "Add-ons".
- Have you set your PC to use Extended Mode?
- Have you set the correct "simulator to wall/screen" distance? Measure it, double check it and confirm the values in "Settings", "Calibration", "Full calibration", "Calibrate". Note: you do not have to enter any distances relating to the projector, only to the simulator.
- Is your projector showing the full PC screen image or is it cropping it?
- Does the whole image fit within the boundaries of the screen/wall?
- Is the image rectangular with vertical sides and horizontal top/bottom? Check with a long spirit level and check your projector keystoning settings.
- Are you using a projector zoom function to set the image size? If so, the image size may vary between sessions and you should carry out the three step projection setup at the start of each session.
- Has the projector's distance from the screen, or height from the floor, changed (even slightly) from one session to another? If so, you must carry out the the three step projection setup procedure.
- When you carry out the three step projection setup procedure does the length of the line in the second step vary by more than a millimetre from session to session or time to time? If so, your projector has moved (which explains the change and is OK) or it isn't displaying a consistent image and things won't work properly.
- Are you carrying out muzzle alignment at the start of each session or each time you fit the Universal Gun Assembly (UGA)? Make sure the UGA is firmly in place (magnetic mounts can move!) and use "Settings", "Calibration", "Alignment", "Align current shooter" at the start of each session.
- Is your eye height setting correct? Use "Settings", "Calibration", "Alignment", "Align current shooter" and take the alignment shots at the "shooter straight ahead" Post-it note.
If you have removed your Post-it note (not a good idea) you must take the alignment shots from your normal shooting position, in your normal shooting stance, with your gun barrel absolutely horizontal and pointing directly in front of you.
This allows the software to calculate your eye height when you are in your normal shooting position and stance - it is not your physical height and it is not the height of your eyes when standing up.
- Are you seeing laser targets and projected targets on the screen at the same time? This is wrong.
Both laser and projected targets shown
- Either: you are using a projector without the optional Projection add-on. This won't work correctly.
- Or: your Projection version is displaying a copy of your PC screen. This won't work correctly.
- With the Projection add-on your projector must be displaying an "extended" screen.
- Please check the User Guide to set up your projector correctly with the Projection add-on and an extended screen.
An easy check for extended or duplicated mode
If the projector is set up correctly the PC display should not be the same as the projected display.
When the DryFire software is running with the normal background, the sidebar, with the "Settings" button in the bottom left corner of the screen, will appear only on the PC display.
Your projector is operating in duplicated mode if you see the "Settings" button on the projected display. This won't work because DryFire requires extended mode.
Shots not seen
- You may be shooting too late (particularly on wide crossers or fast doubles) or, if using projection, the target may be off the screen and in an area where the camera cannot see the laser pulse from the UGA.
You should be able to take all targets within your comfort zone - a fairly narrow angle either side of your straight ahead position - you shouldn't have to chase targets late in their flight. Speak to your coach or instructor to work on your hold point and target acquisition - particularly on the first bird of a pair.
- Check the Universal Gun Assembly (UGA) is switched on.
- Check the red LED flashes on the UGA when the trigger switch is pressed.
- Check the UGA is fully charged.
- Increase the sensitivity of the cameras. More...
Random shots seen or heard
- DryFire is designed for subdued indoor lighting - not bright, not dark, somewhere between.
- Check there is no direct light from doors, windows, ceiling or wall lights reaching the wall or screen. More...
- Check there are no reflective surfaces on the wall, or close to the wall. More...
- Make sure you are not accidentally pressing the trigger as you mount your gun or swing to your hold point.
- Decrease the sensitivity of the cameras. More...
"Pull" not heard
- Check you have set "Acoustic release" not "Timer release". More...
- Increase the sensitivity of the microphone. More...
Targets released before calling "Pull"
- Check you have set "Acoustic release" not "Timer release". More...
- Decrease the sensitivity of the microphone. If sensitivity is too high the microphone may hear background noise or the sound of the servo motors as they move ready to show the target. More...
Targets and results don't feel right
- Check all your measurements in the "Settings", "Calibration", "Full calibration", "Calibrate" screen - and in the "Advanced setup" screen.
- Carry out "Alignment" from the "Settings", "Calibration" screen. Do this at the start of each session.
- Carry out "Alignment" each time you change shooter if more than one person is using the system.
- Check the UGA is securely fitted under the gun barrel - it must not move.
- Uninstall your current version of DryFire, download the latest version from the support page, carefully follow the step-by-step initial procedure for setting up laser targets.
Negative "uh uh" sound when doing alignment
- Check all your measurements in the "Settings", "Calibration", "Full calibration", "Calibrate" screen - and in the "Advanced setup" screen.
- Check you are standing at the correct location (distance from wall, distance left/right of simulator) and you are shooting directly ahead of you, with your gun barrel horizontal, when in the shooting stance.
- Check you are have entered a negative distance if you are standing to the left of the simulator. (Positive = right, negative = left)
- Uninstall your current version of DryFire, download the latest version from the support page, carefully follow the step-by-step initial procedure for setting up laser targets.
Hit shown as a miss
- Clays can be shown within the shot pattern but a miss will be declared if the number of pellets striking the clay, and their remaining energy, are insufficient to break it
- Try taking the shot earlier, use a heavier cartridge load or tighten your chokes.
Targets going the wrong way
Check you haven't accidentally told DryFire the simulator is ceiling mounted.
"Settings", "Calibration", "Advanced setup", "Ceiling mounted".
Changing clay speed
The ability to speed up or slow down a clay (in "Settings", "Clays") was added at the request of DryFire users but it is not as simple as it looks.
The real world speed of a clay is determined by the spring tension on a trap.
In DryFire the spring tension is defined in the simulation file according the rule books - this cannot be changed.
Changing the speed in the "Settings", "Clays" screen is really a slow motion or fast motion function - it doesn't change the spring tension. The clay will appear to be going slower or faster but things like the lead required do not change.
So, be careful when speeding up or slowing down clays using this function - you could learn bad habits because the amount of lead will look wrong.
Adding an add-on
When you purchase an add-on you will be provided with a "key" - a number.
Keys are stored in the simulator so ensure it is switched on and connected to a USB port - the heads will nod when connected.
Go to "Settings", "Add-ons" and enter the key to enable the add-on.
See the "How do I ...?" Guide for more details.