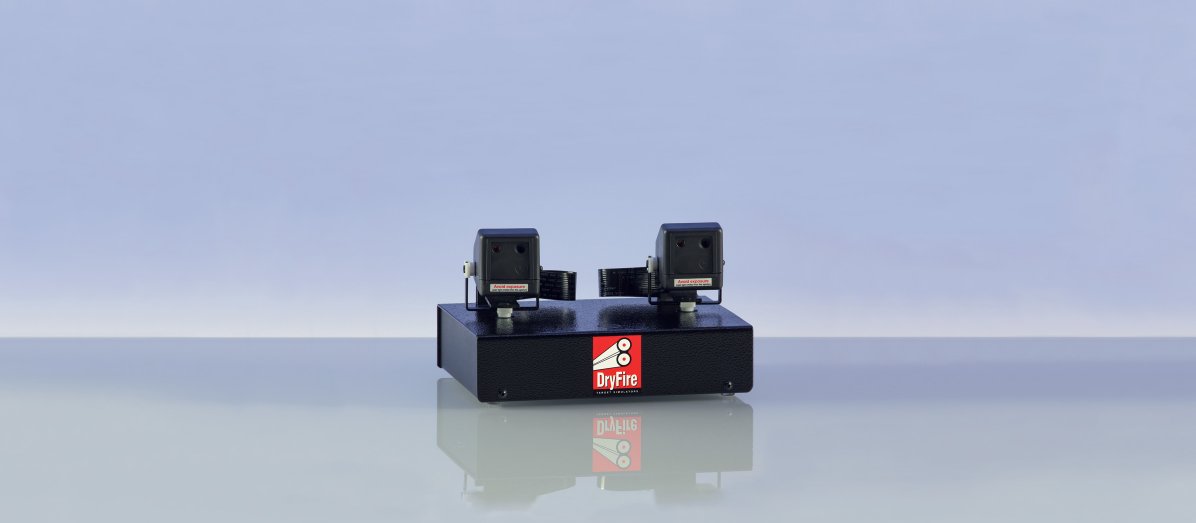
Wire-free on-gun system
There are two parts in the system: IRT (InfraRed Trigger switch) and IRL (infraRed Laser unit).
Both parts:
- Are connected by wire-free infrared signals.
- Contain a battery which can be recharged using a standard USB Type C cable - as used for smartphones etc. The battery will last for over 100 hours of use before requiring recharging.
- Flash the blue LED three times when switched on so you can check the battery is OK.
- Flash the blue "heartbeat" LED every 3 seconds to remind you the unit is switched on.
- Speed up LED flashing if the system has not been used for 5 minutes - a reminder to switch off!
- Allow multiple shooters can use the system in the same room. In this case the two parts can be "paired" so there is no conflict between systems on different guns.
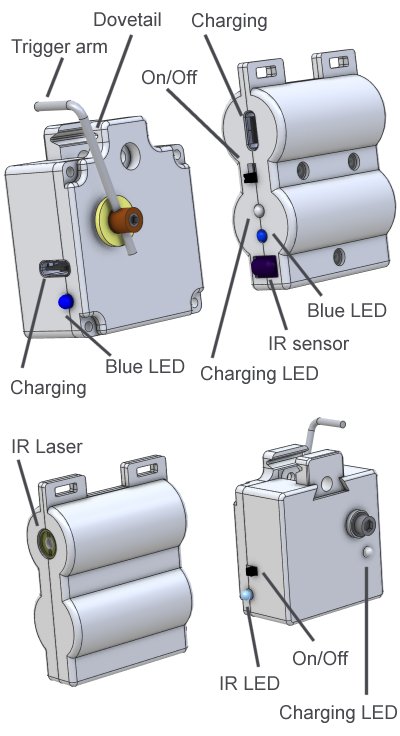
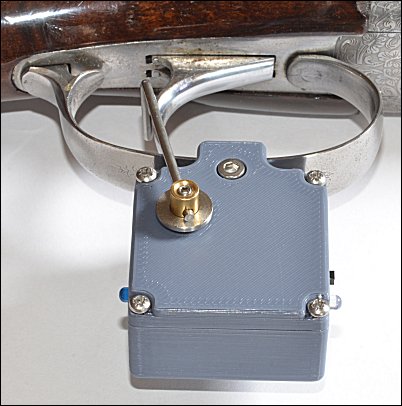
IRT: InfraRed Trigger switch
IRT shares its construction with the TS22 wired trigger switch. The body is longer to accept the battery, PCB and infrared components.
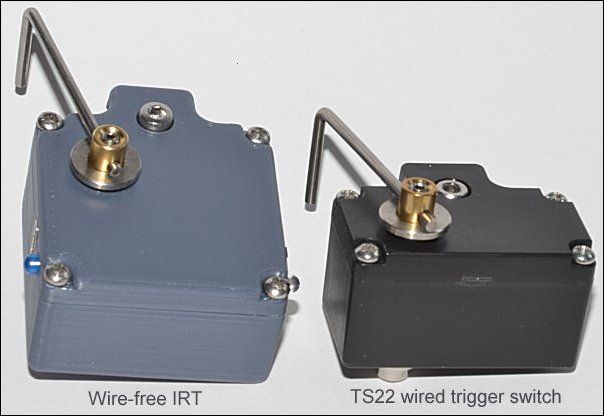
IRT and TS22 are assembled in the same way and both units allow the operating arm to be on either side to suit right and left handed shooters.
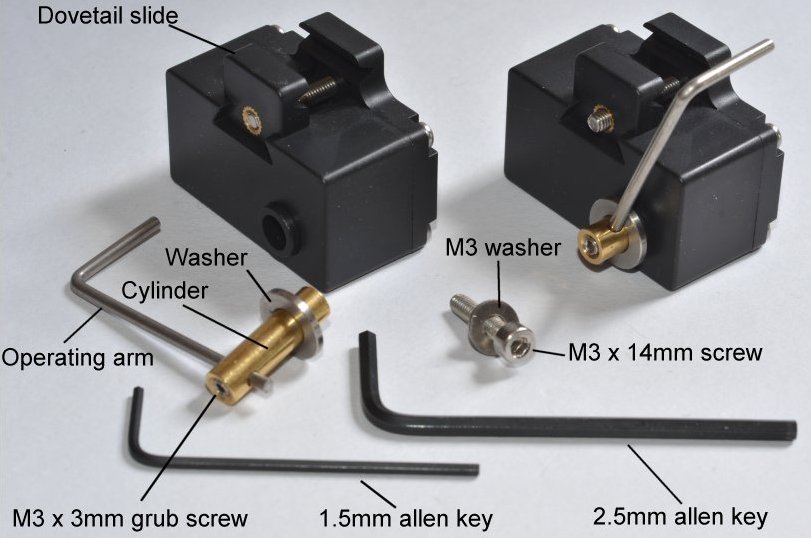
- Dovetail slide: fits the switch to the trigger guard.
- Operating arm: fits behind the trigger blade and moves backwards when the trigger is pressed.
- M3 x 3mm grub screw: holds the operating arm in place in the cylinder.
- Cylinder: passes through the body of the switch and rotates to operate the switch.
- Washer: fitted on the cylinder between the operating arm and the body of the switch.
- M3 x 14mm screw: holds the cylinder in place.
- M3 washer: this fits between the M3 x 14mm screw and the body of the switch.
- 1.5mm allen key: for fitting the M3 x 3mm grub screw.
- 2.5mm allen key: for fitting the M3 x 14mm screw and the M3 x 18mm screw in the dovetail slide.
IRT: Installation
Please follow the fitting instructions (see below) carefully. Sitting down with your gun across your lap is probably the best way to do it.
Warning: you will find it "fiddly" the first time you set up the trigger switch so take things slowly and be careful not to break or strain anything - take a break if you start feeling hot under the collar!
The good news is that once it is set up correctly it will be much easier and faster next time you use the system.
The instructions allow you to set up for right hand or left hand use.
Important warning
Do not put the operating arm hard up against the trigger blade.
The operating arm rotates very slightly - about 1.5mm - see the video below.
Trying to force the operating arm beyond this limit of movement will damage the switch.
When installed correctly the switch should operate during the last 1.0mm/1.5mm of trigger movement.
You can feel, and perhaps hear, the internal switch operating as the operating arm is pressed.
IRT: fitting instructions
- Use the 2.5mm Allen key to remove the operating arm and brass cylinder by undoing the M4 14mm cap head hex screw. Don't lose the washers!
- Use the 2.5mm Allen key to slacken off the M3 18mm cap head hex screw that holds the dovetail slide in place. Don't remove the screw entirely.
- Fit the body of the switch to the trigger guard - the edges of the guard will fit into the horizontal slots in the dovetail slide and body.
Don't over-tighten - firm but not tight is correct!
The switch should be under the centre of the guard - see the photo above.
- Insert the brass cylinder (with operating arm and washer) into the switch body (with the top of the operating arm behind the trigger blade) and hold it in place using the M3 14mm cap head hex screw.
Don't tighten the screw at this stage.
The cylinder should be inserted into the side opposite to where your trigger finger will go so the operating arm does not interfere with your trigger pull.
- Adjust the position of the operating arm so the horizontal top rests where the back of the trigger blade will be when a shot is taken. If necessary adjust the length of the operating arm by slackening off the M3 grub screw using the 1.5mm Allen key.
- When everything is in place you can tighten up the M3 14mm screw holding the cylinder in place.
Don't over-tighten - firm but not tight is correct!
- From now on you should never have to adjust the length of the operating arm - slacken off the M3 18mm screw for the dovetail slide for it to open up enough for you to remove and refit the switch.
When next fitting the switch, adjustments to the location of the top of the operating arm can be made by sliding the switch backwards or forwards on the trigger guard before fixing it in place.
- Check that IRT and IRL are facing one another and less than 1m (1 yard) apart, switch on the IRL and press the trigger as normal (don't hold the trigger down!) - you should see the red LED flash on the IRL to confirm it has received the signal to fire the laser.
IRL: InfraRed Laser unit
This receives the signal from the IRT and fires a pulse of infrared laser light.
Leave on but off!
You can leave the system on your gun until your next outdoor shooting session.
However, don't forget to switch off both the IRT and IRL units - as a reminder they will speed up their flashing if you leave them unused for more than five minutes.
If the units don't flash when next switched you will need to recharge them using a standard USB C charging cable - as used for smartphones,and tablets etc.
IRT and IRL pairing
IRT and IRL are a matching pair and will work without change - no additional pairing is required.
Where two or more guns, fitted with the wire-free system, are using the DryFire in the same room at the same time, there is the remote possibility that pressing the IRT on one gun will fire the laser on another - as indicated by the blue LED flashing on IRL of the other gun. In real life this is very unlikely to happen.
However, if it does happen the solution is quick and simple.
On the gun causing the problem (the one which fires the laser on another gun):
- Ensure that any other guns using the wire-free system are more than 3m away or switched off.
- Ensure that IRT and IRL are mounted correctly - check that a normal trigger press causes the IRL to flash once.
- Hold down the trigger and watch for the IRT blue LED to flash once (this happens after 5 seconds.)
- Release the trigger and look at the IRL unit - its blue LED should flash 5 times to confirm that it has received a new pairing address. If it does not flash 5 times, try the procedure again.
Switching between normal and release trigger
"Normal" trigger actions fire when the trigger is pressed. "Release" trigger actions (used by very few shooters in an attempt to cure flinch) fire when the trigger is released.
As shipped, IRT will function as a normal trigger action.
To swap between normal and release trigger:
- Hold down the trigger and watch for the second flash of the blue LED. It flashes once at 5 seconds and a second time at 10 seconds.
- Release the trigger. The blue LED will flashes 4 times if the IRT is now in release mode. It will flash 2 times if the IRT is now in normal mode.