Hardware and room preparation
Laser targets first
Start with laser targets first - even if you have purchased the projection version.
This will ensure that all measurements are correct and targets are being displayed and hit (or missed!)
You can move on to projection setup when laser targets are working correctly.
Lighting
DryFire detects a pulse of infrared (IR) light fired from the Universal Gun Assembly (UGA) so you require a room with subdued lighting and with no direct or reflected sunlight or artificial light falling on the wall/screen.
You will probably want a darker room if you are using the projection add-on - so you can see the screen better.
Be careful with targets taken beyond your normal break zone - the cameras may see light to the sides and you may get false shots. Check for reflected light from doors or windows, reduce overall lighting and try again. If all else fails, you can reduce the sensitivity of the cameras.
Measurements
DryFire needs to know two things to display accurate targets :
- where the simulator is (distance from wall and height above floor),
- where your eyes are (distance from wall and eye height when you are in your shooting stance).
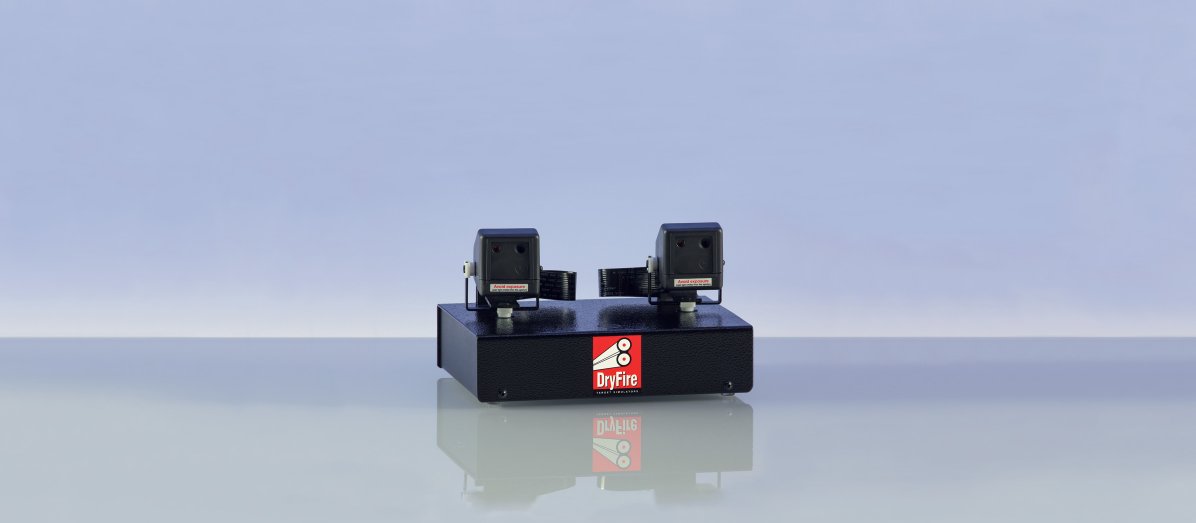
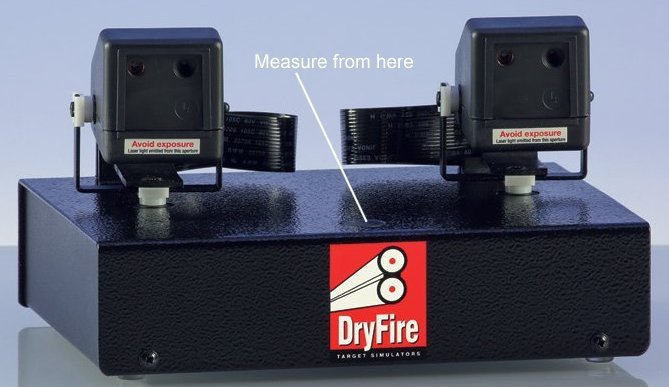
The reference point for measurements is the centre of the circular indentation on the top surface of the simulator's metal case.
The drawing below has the simulator mounted on a DryFire shooting stand:
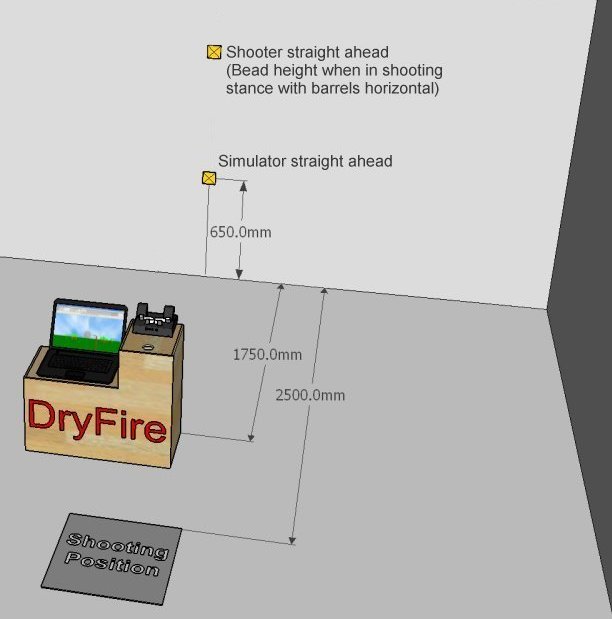
The drawing shows:
- simulator to wall: 1.75m,
- simulator from floor: 0.65m,
- shooter from wall: 2.50m,
- the lower Post-it note marking the simulator straight ahead position - directly in front of, and at the same height as, the simulator,
- the upper Post-it note marking the shooter straight ahead position - directly in front of, and at the same height as the shooters eye's when in the shooting stance.
- This is an example only - your measurements will probably be different.
Take great care with "shooter straight ahead".
- DryFire calculates everything from the viewpoint of your eyes when in the shooting stance.
- This is not the same as your physical height and not the same as your eye height when standing up.
- Imagine a shooter 1.83m (6') tall.
When in the shooting stance, with the barrels perfectly level, the bead points to a location 1.52m (5') from the floor. That is the shooter straight ahead height for the Post-it note.
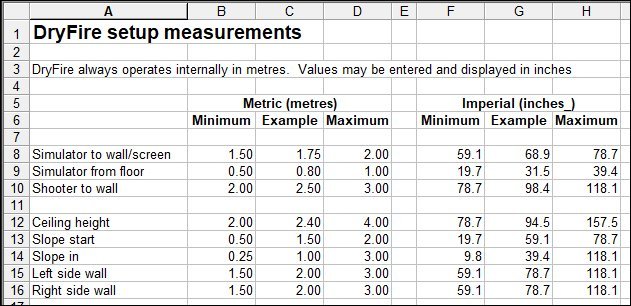
The spreadsheet below shows suitable measurements for use with DryFire. The ceiling, slope, left wall and right wall values are rarely used.
Detailed preparation
- Prepare two Post-It notes (see the drawing above) by drawing diagonal lines to mark their centres.
- The DryFire simulator should face the centre of the wall/screen and be absolutely parallel with it.
- The reference point for DryFire measurements is the centre of the indented circle on the top of the simulator's metal case.
- The simulator should be between 1.5m and 2.0m from the wall/screen.
- The simulator should be between 0.5m and 1.0m from the floor.
- Put a Post-It note on the wall/screen directly in front of the simulator and at the same height - this is the "simulator straight ahead" position. Measure the distance from the wall/screen and the height from the floor.
- Measure how far the left and right walls are from the simulator.
- Measure the ceiling height.
- If the wall has a slope, measure how far up from the floor it starts and how far the top extends into the room.
- Decide your shooting position and measure the distance from the wall/screen.
- Stand in your shooting position, adopt a shooting position pointing straight ahead with your gun barrel horizontal. (Get someone to put a spirit level on your barrel to ensure it is horizontal.) Use a Post-It note to mark the position your are pointing at on the wall/screen. This is the "shooter straight ahead" position
- If your shooting position is not directly behind the simulator measure how far it is to the right (entered as a positive value, e.g. 0.60m) or left (entered as a negative value, e.g. -0.60m) of the simulator straight ahead position.
- Write down all your measurements before running the software. Keep the list safe for future reference
Gun assembly setup
The gun assembly has two parts: a trigger switch and a Universal Gun Assembly (UGA).
UGA Safety
Note: the photo shows the original clamp used with the UGA - this has now been replaced with an ABS plastic clamp held in place with a single Pozi type screw.
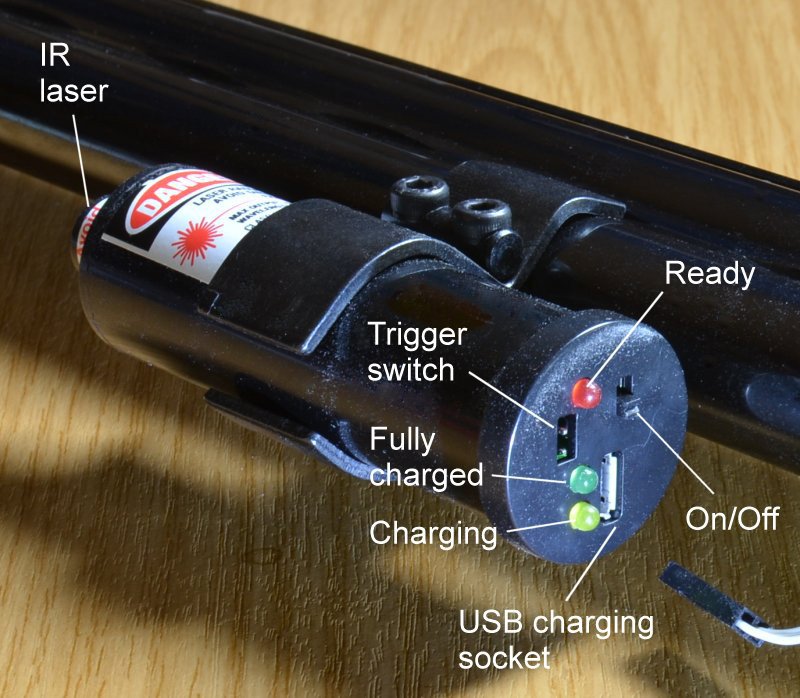
The Universal Gun Assembly (UGA) sends out a short pulse of low power infrared (IR) laser light when you press the trigger. IR is invisible to the human eye but can still be dangerous so never look directly into the laser and never point it at anyone.
UGA battery charging
The UGA contains a rechargeable battery which may be charged from any USB port or USB charger.
The UGA requires charging before first use. A yellow "charging" LED will illuminate when charging and a green LED will illuminate when fully charged.
It is worth periodically charging the UGA until the green LED is illuminated even if it is still functioning correctly. Strange things can happen on low charge, e.g. you may be able to carry out muzzle alignment but DryFire may not report shots when you fire at targets.
Trigger switch fitting
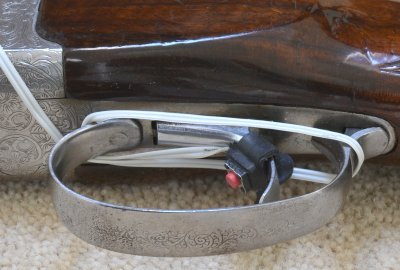
Wrap the trigger switch round the trigger as tightly as possible and wrap the excess cable round the trigger guard. Fit the switch so the rubber tail is out of the way of your trigger finger - this it will be different for left and right handed shooters.
Some people have fitted the switch the other way round so it is activated when pressed against the back of the trigger guard. There is no "right" or "wrong" way as long as it works!
Our article about the optional TS22 trigger switch contains instructions for fitting and use.
UGA fitting and use
Note: the photo shows the original clamp used with the UGA - this has now been replaced with an ABS plastic clamp held in place with a single Pozi type screw.
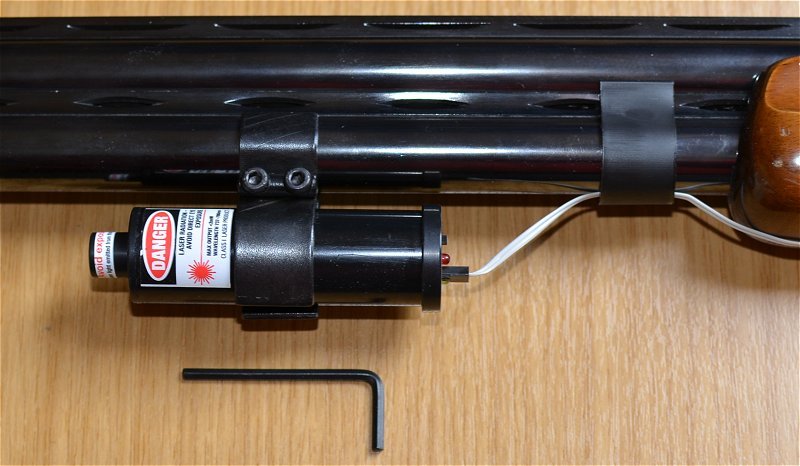
- Clamp the UGA under your barrel, close to the end of the forestock.
- Plug the trigger switch cable into the socket on the back of the UGA.
- Secure the excess cable out of the way.
In some cases it is possible to run the cable inside the forend - between the wood and the barrel.
- Switch on the UGA - the red LED will flash.
- Press the trigger switch, the red LED should flash each time you do this.
- The red LED will continue to flash periodically to show the UGA is switched on.
- Switch off the UGA after use.
- Recharge the UGA from a USB port or USB charger.
The UGA comes ready for normal "press to shoot" mode, see the Advanced UGA setup section for "release to shoot" mode.